In the complex world of product development, it’s alarmingly easy to build for a vague, faceless “user.” We fill this void with our own assumptions, biases, and experiences, leading to products that are, at best, mediocre and, at worst, completely unusable for their intended audience. After 20 years in UX and IT architecture, I’ve learned that the single most powerful tool to combat this is not a new framework or a louder stakeholder, but a deep, empathetic understanding of the human beings we’re designing for. This understanding is crystallized in the form of personas.
But not all personas are created equal. A bullet-point list of demographic data is a ghost; it has a form but no substance. What we strive for are Engaging Personas—rich, narrative-driven profiles that incorporate the goals of goal-directed personas, the context of role-based personas, and the psychological depth of rounded personas. They are characters in the story of your product, and their scenarios are the plot.
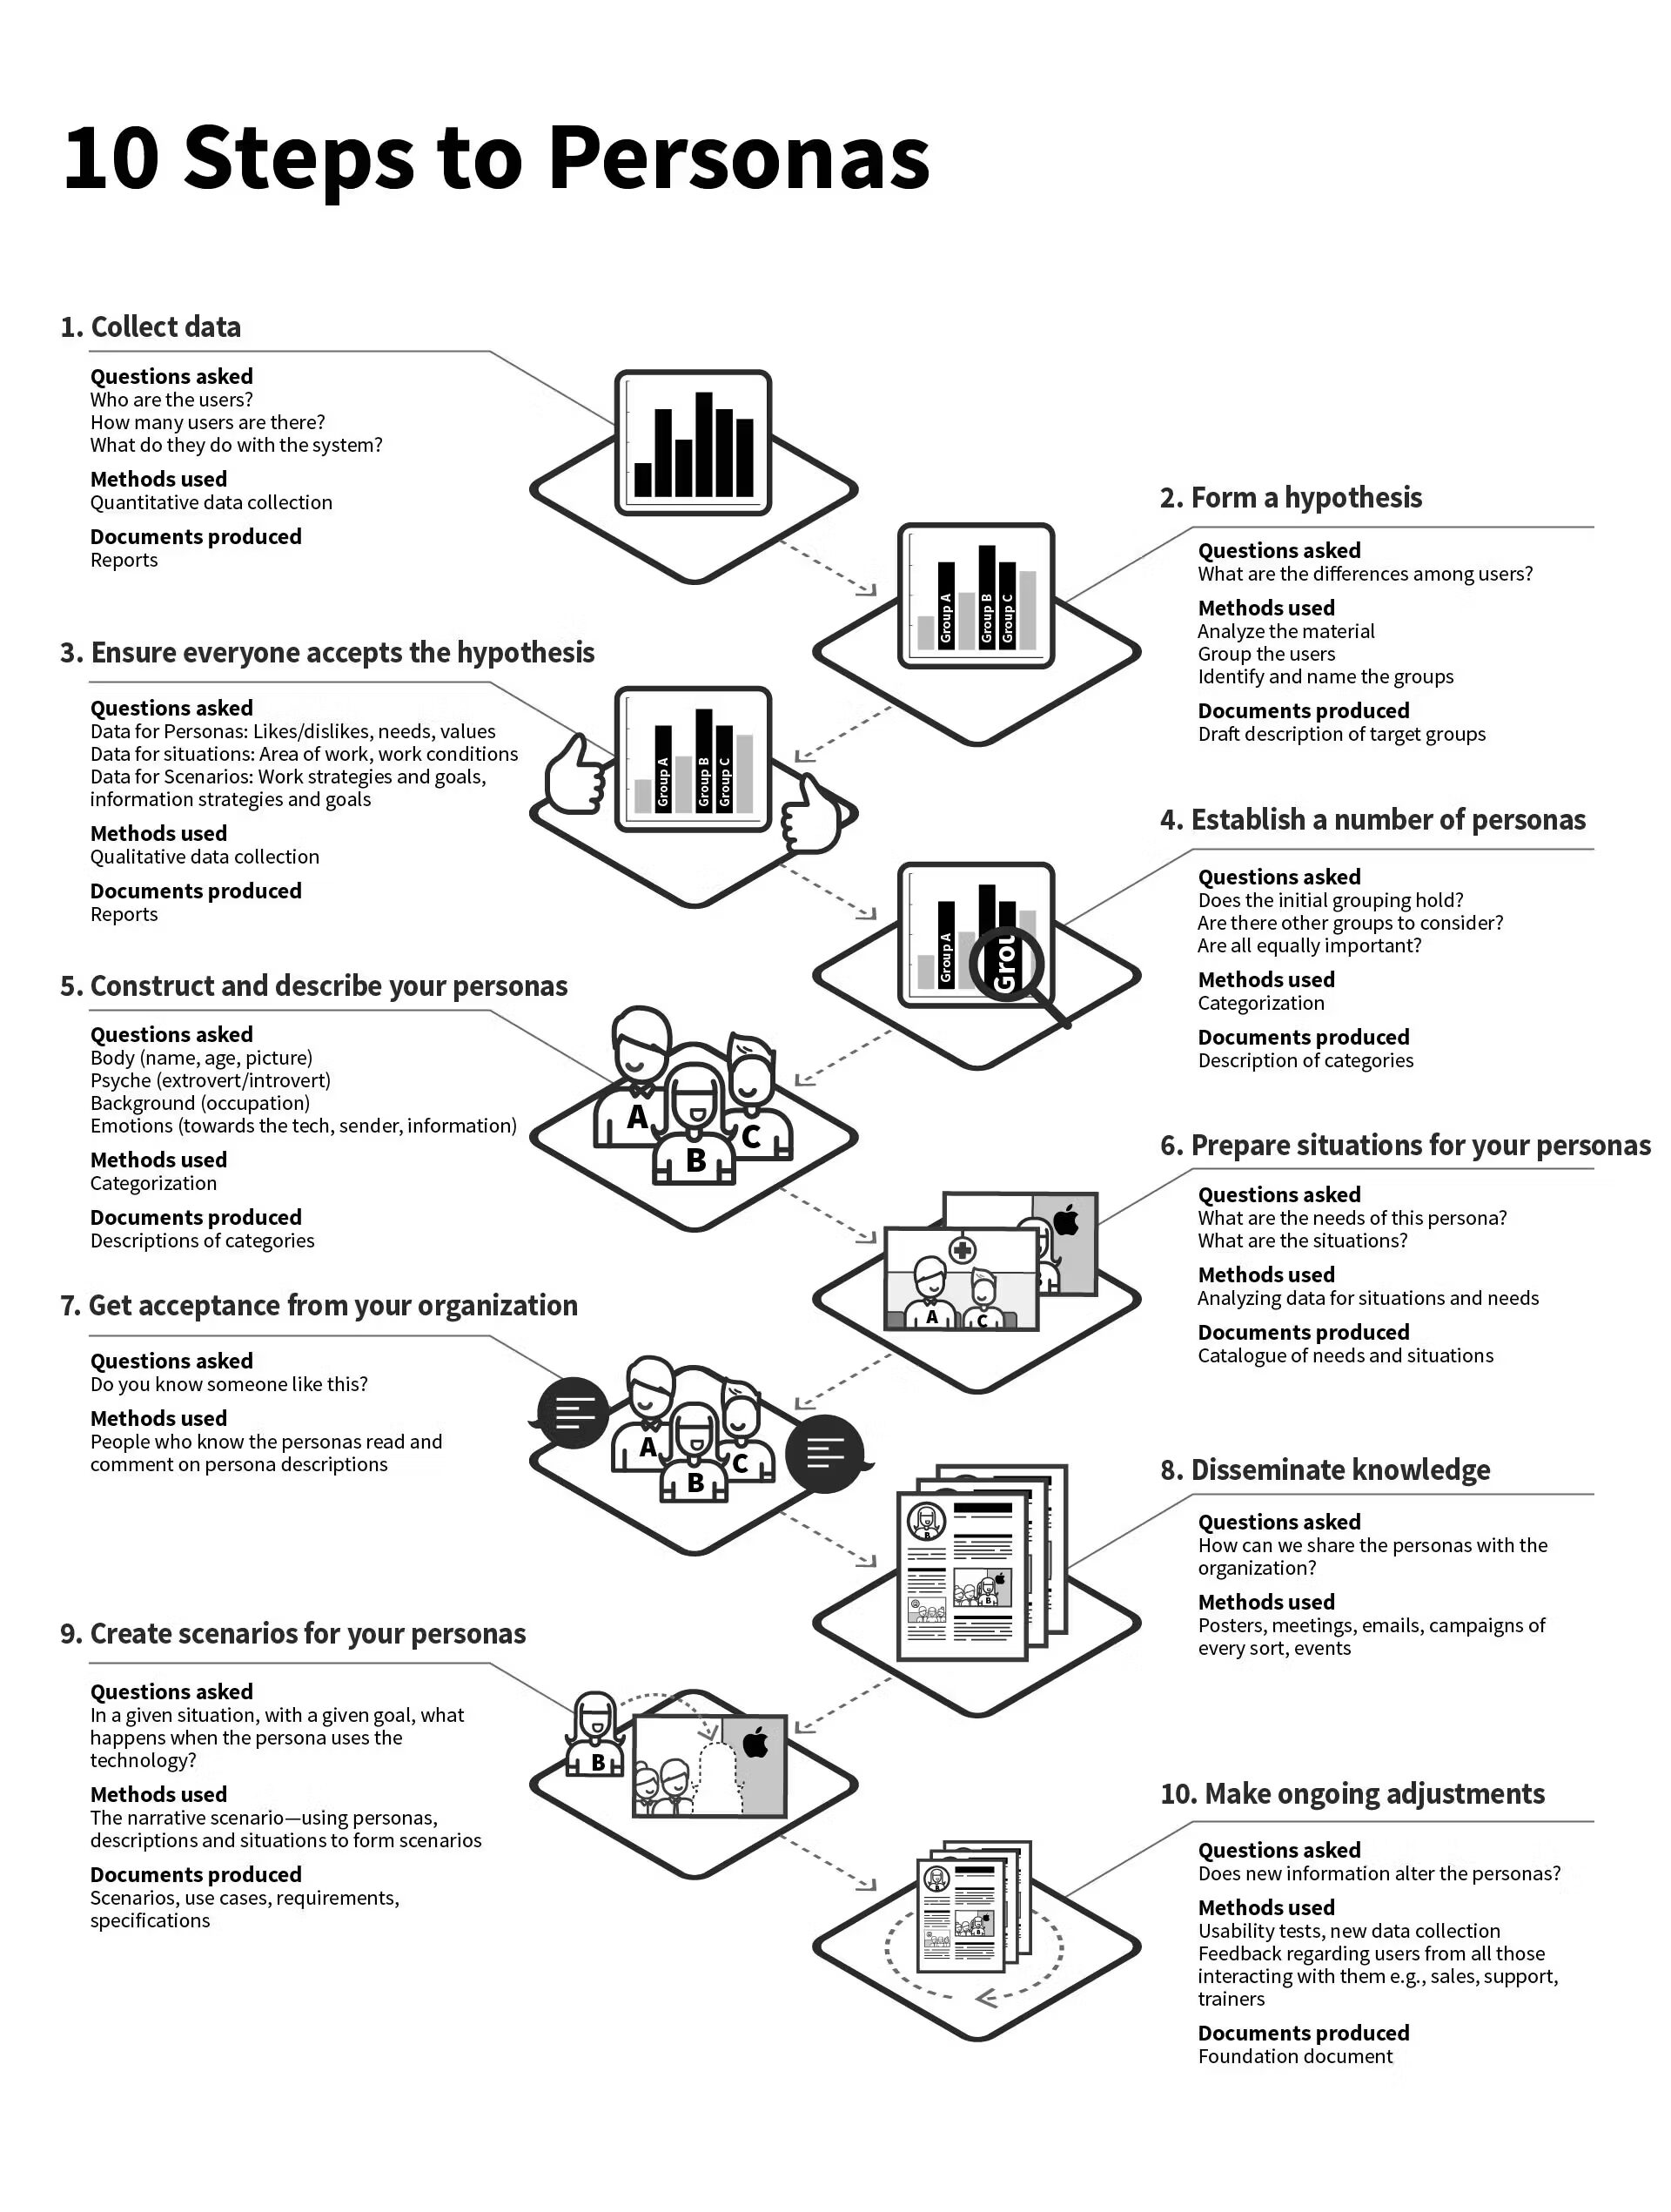
This 10-step process, eloquently framed by Lene Nielsen in her Interaction Design Foundation encyclopedia article, is a robust methodology for creating these engaging personas. It’s a holistic cycle, moving from raw data to organizational adoption and continuous evolution.
Let’s deconstruct this ideal process, diving into the inputs, outputs, tools, and architectural thinking required at each stage.
The Four Pillars of the Persona Lifecycle
The 10 steps can be grouped into four critical phases that ensure your personas are grounded, tangible, useful, and living:
Data Collection and Hypothesis (Steps 1 & 2): The foundational research.
Persona Description and Scoping (Steps 4 & 5): The synthesis and creation.
Scenario Creation for Development (Steps 6 & 9): The application and ideation.
Organizational Buy-in and Evolution (Steps 3, 7, 8 & 10): The adoption and lifecycle management.
Step 1: Collect Data – The Empirical Foundation
The “Why”: You cannot build a representative model without a robust dataset. This step is about replacing assumptions with evidence. In the Design Thinking process, this is the “Empathise” phase, and it’s non-negotiable.
Inputs:
Project goals and business objectives.
Initial stakeholder assumptions about users.
Access to potential or existing users.
Methods & Tools:
Quantitative Data Collection: Use analytics platforms like Google Analytics or Mixpanel to understand what users are doing at scale. How many are there? What are the key workflows? Surveys (Typeform, SurveyMonkey) can provide broad-stroke insights into demographics and behavior patterns.
Qualitative Data Collection: This is where the depth comes from. Conduct user interviews (recorded and transcribed with tools like Otter.ai), contextual inquiries (observing users in their natural environment), and diary studies. Hotjar or FullStory session recordings can reveal pain points in existing products.
Expected Outputs:
Reports: A synthesized repository of findings. This isn’t just a data dump; it’s an organized collection of transcripts, audio clips, video highlights, analytics reports, and survey summaries.
Best Practice:
Cast a wide net. Don’t just talk to your most vocal users. Seek out the beginners, the experts, the frustrated, and the apathetic. The goal is to understand the full spectrum of your user base, not to confirm your pre-existing beliefs.
Step 2: Form a Hypothesis – The Initial Synthesis
The “Why”: Raw data is chaotic. This step is about finding patterns and forming an initial, testable theory about your user segments.
Inputs:
The synthesized data reports from Step 1.
Methods & Tools:
Affinity Diagramming: A powerhouse technique. Write observed behaviors, user quotes, and pain points on sticky notes (physical or digital using Miro or Mural). As a team, silently group them based on natural relationships. The emerging groups are your nascent user segments.
Empathy Mapping: Use the “Say, Think, Do, Feel” model for each potential user group to quickly externalize your hypothesis about their experience.
Expected Outputs:
Draft Description of Target Groups: A high-level summary of the hypothesized user types. For example: “We believe there are three main users: the Time-Pressed Executive, the Data-Savvy Analyst, and the Hands-On Field Technician.”
Best Practice:
Involve cross-functional team members (developers, marketers, support) in this synthesis. Their diverse perspectives will reveal patterns you might have missed.
Step 3: Ensure Everyone Accepts the Hypothesis – The Reality Check
The “Why”: A hypothesis is useless if it’s built in a silo and rejected by the rest of the organization. This step is about socializing your early findings and pressure-testing them against the collective knowledge of the company.
Inputs:
The draft target group descriptions from Step 2.
Methods & Tools:
Qualitative Data Collection (Round 2): Present your hypothesis in a workshop setting. Use techniques like stakeholder interviews to ask: “Does this match your understanding of our users? What’s missing? What seems wrong?”
Cross-Functional Workshops: Gather a diverse group and walk them through the affinity diagrams. The goal is to achieve a shared mental model.
Expected Outputs:
Validated or Revised Reports: An updated set of user segments that the team collectively believes in. This is a crucial step for building early buy-in.
Best Practice:
Frame this as a collaborative investigation, not a presentation. You are not defending your work; you are facilitating the team’s shared understanding.
Step 4: Establish a Number of Personas – The Art of Scoping
The “Why”: You can’t design for 12 different people. This step forces prioritization. You must decide which user groups are primary, secondary, and, sometimes, tertiary. As Alan Cooper, the pioneer of personas, advocates, you must identify a primary persona—the one main character for whom the product must be optimized, even if it means not satisfying others perfectly.
Inputs:
The validated user groups from Step 3.
Methods & Tools:
Categorization & Prioritization Matrices: Use a 2×2 matrix, plotting user groups based on business value vs. user need or frequency of use vs. market size. The groups in the high-value quadrants are your primary candidates.
Expected Outputs:
Description of Categories: A finalized list of personas, clearly labeled as Primary, Secondary, etc. A good rule of thumb is 3-5 personas total to keep the team focused.
Best Practice:
Be ruthless. If a persona’s needs are entirely subsumed by a primary persona, consider folding them in. Avoid “edge case” personas that will distort the core design.
Step 5: Construct and Describe Your Personas – Breathing Life into Data
The “Why”: This is where data transforms into a human being. A good description allows a designer or developer to empathize and make user-centric decisions autonomously.
Inputs:
The raw data from Step 1.
The finalized categories from Step 4.
Methods & Tools:
Structured Narrative Templates: Create a consistent template for all personas. Key sections include:
Body: Name, age, a realistic stock photo (tools like Generated Photos or This Person Does Not Exist can avoid bias).
Psychographic Profile: Introvert/Extrovert, analytical/creative (frameworks like the Big Five can be loosely inspirational).
Background: Occupation, education, lifestyle.
Emotions & Attitudes: Their feelings towards technology, the domain, and their core frustrations.
Goals & Needs: Their overarching life and work goals, and the specific needs your product can address.
Frustrations & Pain Points: What currently stands in their way.
Expected Outputs:
1-2 Page Persona Descriptions: Compelling, easy-to-scan documents that feel real. Tools like Xtensio, HubSpot’s Make My Persona, or even well-designed Figma or Google Docs templates work well.
Best Practice:
The name and photo are crucial for creating empathy, but the frustrations and goals are the most critical design tools. Spend 80% of your energy here. As the Nielsen Norman Group advises, keep your personas concise and goal-oriented.
Step 6: Prepare Situations for Your Personas – Setting the Stage
The “Why”: A persona in a vacuum is a character without a story. “Situations” are the triggers—the contexts and problems—that lead the persona to seek out your solution.
Inputs:
The completed persona descriptions.
Data about user environments and contexts from Step 1.
Methods & Tools:
Analyzing Data for Situations and Needs: Revisit your research. What was happening right before a user encountered a problem? Was it a time-sensitive request from their boss? A system failure in the field? A personal goal they wanted to achieve?
Expected Outputs:
Catalogue of Needs and Situations: A list of specific, contextual triggers. For example: “Situation: It’s 4:45 PM on a Friday, and Maria needs to pull a last-minute sales report for a board meeting first thing Monday morning.”
Best Practice:
Focus on the problem, not the solution. The situation describes the user’s context and need before your product magically appears.
Step 7: Get Acceptance from Your Organization – The Final Seal of Approval
The “Why”: If the team doesn’t believe in the personas, they won’t use them. This step is the final validation before full-scale dissemination.
Inputs:
The nearly-final persona descriptions and situations.
Methods & Tools:
Participatory Review Sessions: Present the personas to a broad audience. The most powerful question you can ask is: “Do you know someone like this?” When a salesperson says, “That’s exactly my client, Sarah!”, you’ve achieved success.
Feedback Loops: Use Confluence pages or Google Docs with commenting enabled to gather structured feedback.
Expected Outputs:
Organizationally-sanctioned personas that are seen as credible and accurate.
Best Practice:
Be open to feedback. If a key stakeholder points out a major flaw, be prepared to revisit the data. This process should be collaborative, not dictatorial.
Step 8: Disseminate Knowledge – Making Personas Ubiquitous
The “Why”: Knowledge that is hard to find is knowledge that won’t be used. Personas must be a living part of the team’s ecosystem.
Inputs:
The finalized persona documents.
Methods & Tools:
Multi-Channel Campaigns:
Posters: Print large, visually appealing persona sheets and hang them in common areas.
Digital Access: Create a central “Persona Hub” on your intranet (e.g., Confluence, Notion).
Events: Hold a persona “launch party” to introduce them to the company.
Snippets: Add persona key traits to Slack or Teams channels for quick reference.
Expected Outputs:
Widespread awareness and easy access to persona knowledge across the organization.
Best Practice:
Don’t just send an email. Make the personas visible and memorable. Turn them into heroes.
Step 9: Create Scenarios for Your Personas – The Narrative Engine
The “Why”: This is where the magic happens. Scenarios are the stories of how your persona uses a product or service to achieve their goal within a specific situation. They are the primary tool for generating design ideas and validating requirements.
Inputs:
Personas (Step 5).
Situations (Step 6).
Methods & Tools:
The Narrative Scenario: Write a short story. “Maria has just been asked for the Q3 report. She feels stressed because it’s late. She opens our application with the goal of generating the report in under 5 minutes. She first looks for…”. Tools are simple: a word processor or a whiteboarding tool for journey mapping.
Expected Outputs:
Scenarios, Use Cases, Requirements, and Specifications: These narratives directly translate into functional requirements. They answer the question: “In a given situation, with a given goal, what happens when the persona uses the technology?”
Best Practice:
Keep scenarios focused on the user’s journey and mental model, not on UI specifics. The scenario describes the “what” and “why,” from which the “how” (the design) will emerge.
Step 10: Make Ongoing Adjustments – The Living Document
The “Why”: Your users and market are not static. Your personas shouldn’t be either. This step ensures they remain accurate and relevant assets.
Inputs:
New user research, usability tests, and feedback.
Input from customer-facing teams (Sales, Support).
Methods & Tools:
Continuous Feedback: Integrate persona feedback into your regular agile rituals. After a usability test, ask: “Does what we learned change our understanding of any persona?”
Scheduled Reviews: Put a quarterly or bi-annual review of the “Persona Foundation Document” on the calendar.
Expected Outputs:
Revised Persona Descriptions: Updated documents that reflect the current reality of your user base.
Best Practice:
Treat your personas like a product. They have a lifecycle and need a “product manager” (often the UX Lead or Researcher) to maintain their integrity over time.
Conclusion: From Abstract to Actionable
Creating engaging personas is not a one-week exercise to be filed away and forgotten. It is a strategic commitment to human-centered design. This 10-step process provides a robust framework, but its success hinges on a cultural shift within your organization—a shift from building for “the user” to designing for “Maria,” “John,” and “Akira.”
When you invest in this process, you stop debating features based on personal preference and start evaluating them based on whether they serve your primary persona’s goals. You create a shared language that unites designers, developers, and marketers. You build not just with code, but with empathy and purpose. And in the end, that is what separates good products from great, beloved experiences.
References & Further Reading:
Nielsen, L. (2019). Personas – Why and How You Should Use Them. Interaction Design Foundation.
Cooper, A. (1999). The Inmates Are Running the Asylum. SAMS Publishing.
Pruitt, J., & Adlin, T. (2006). The Persona Lifecycle: Keeping People in Mind Throughout Product Design. Morgan Kaufmann.
Gibbons, S. (2019). How to Create UX Personas. Nielsen Norman Group.
Govella, A. (2019). Collaborative Product Design. O’Reilly Media.